![IMG_8021[3622].PNG](https://static.wixstatic.com/media/dceb40_fc79390f34f346cea86c369ebba11d6e~mv2_d_2048_1676_s_2.png/v1/fill/w_231,h_189,al_c,q_85,usm_0.66_1.00_0.01,enc_avif,quality_auto/IMG_8021%5B3622%5D_PNG.png)

3 Creative Ways To Dye Easter Eggs
- Hollie's Homemade Life
- Apr 20, 2019
- 4 min read

Easter is almost here which means sunrise service at church on Easter morning, baskets filled with oodles of treats and goodies, and of course, egg hunts. But, we can't forget one tradition that has been dated back to the13th century, the coloring Easter eggs. Did you know that this tradition started with dyeing ostrich eggs? Imagine trying to fit one of those in a cup of food coloring!
When I was little, I remember putting the eggs in a mixture of water, vinegar, and food coloring. Watching the eggs go from white to a beautiful shade of red, blue, green, or yellow. Nowadays, you can buy Easter egg kits at the store in a wide variety of different coloring designs. Those can be pretty pricey though. Below, my special helper, Es, and I tried three easy and entertaining ways to color Easter eggs this year that are not hard on the pocket book.
Rice Dyed Easter Eggs
What you will Need:
Rice
Food Coloring
Ziploc Bag
Hard Boiled Eggs

Pour about a 3/4 cup of rice into each Ziploc bag then add about 8-10 drops of food coloring. Stir the rice and food coloring together with a spoon.


Place your hard boiled egg in the Ziploc bag and shake it. Once you are satisfied with how your egg looks, set it aside so it can dry a little and start on your next egg. Don't be afraid to put the eggs in the other colored rice bags. The more colors on each egg the better. Add more food coloring if you need to.


Let them dry for about 2 hours and you are finished.

These eggs remind me of the multi colored crayons you can make by melting different crayon shavings together. Anybody ever make those or remember them? They were my favorite type of crayons as a child.
Tie-dyed Easter Eggs
What you will need:
Food Coloring
Paper Towels (select-a-size works best)
Small Elastic Bands or Twist Ties
Spray Bottle Of Water
Hard Boiled Eggs
Rubber Gloves

Take your paper towel and cut it in half (if you don’t have the select-a-size paper towels). Place your first egg in the middle of the paper towel and cover it so you can’t see the egg anymore. Twist the top and secure it with an elastic band.

Next, hold the top of the paper towel while you take your food coloring and place drops directly onto the paper towel, making sure you are spacing out your drops of color. You can place different drops of color near each other, but, too many too close together will make the colors mix completely. We also had a separate piece of paper towel on the table just in case any food coloring accidentally missed the egg.

When you have all the drops of food coloring you want on your egg, you‘ll then need to put on your rubber gloves for this next step. Hold the egg in one hand and spray it with the water. Spray a small amount of water around the egg until the paper towel is damp, making sure there aren't any white spots and it's completely colored. We noticed on the eggs where we used less water ended up having a vivid color than the ones that had more water sprayed on them. So, if you want brighter colors on your eggs, only spray a minimal amount of water.

After you are done spraying the paper towel, you will need to gently squeeze the egg to assure that there is no excess water. This will also help transfer the colors onto the egg.
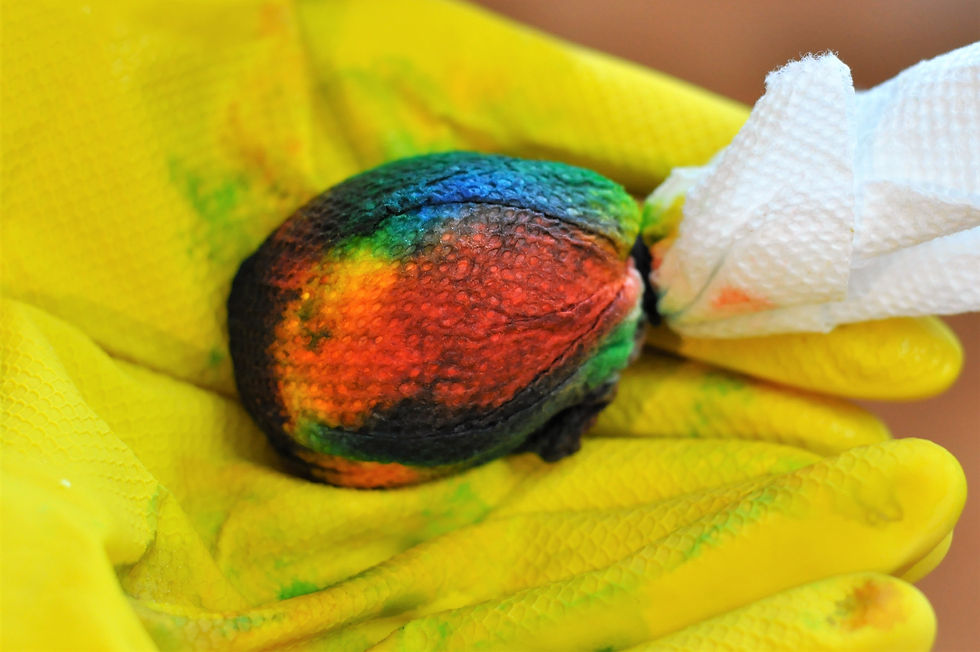
Place the egg to the side in baking dish or pan to air dry. You can use a fan on them for a faster drying time but, we just let ours dry for about 7 hours.

Now comes the big reveal! Once the eggs have had enough time to dry, you can start to unwrap them and check out your masterpieces.

I love how these turned out! Each egg has it's own cool Tye-dyed effect to it. I also like how the paper towel gave them a textured look. So groovy!!!
Whip Cream Dyed Easter Eggs
What you will need:
Whip Cream
Gel Food Coloring
Hard Boiled Eggs
Muffin Tin

Take your muffin tin and add two nice size scoops of whip cream to each opening. Pick the colors of gel you want to use for each egg add to the whip cream. You'll want to pick at least 2-3 different colors for each egg. Squeeze a generous amount of gel coloring on top of each whip cream section. Use a tooth pick or Popsicle stick to make a marbleized design by moving it up and down or side to side. Be careful not to mix the colors together too much. You'll want to be able to see each individual color on the egg.

Place your first egg into of one of tin sections. Begin to roll the egg in the whip cream carefully. Again, make sure you don't mix the colors together too much by rolling the egg around excessively.


Once your egg is completely covered in whip cream, set it aside to let the dye set in on the egg. Continue with your next one and so on. After all the eggs have been coated with the colorful whip cream, wait about an hour and gently wipe of the excess whip cream with paper towel and water revealing a beautiful marbleized effect on the eggshell.

We had so much fun dyeing these eggs. Es did have gloves on at first but, decided that they were getting in the way and he felt that getting his hands messy with whip cream was no big deal (and pretty awesome!) Besides, he was able to lick his fingers clean after the last egg. Who wouldn't love that?!
I haven't dyed Easter eggs in years and boy have I missed it! These eggs turned out so cool looking and every one of them was more unique than the next. It's hard to pick a favorite.

All three methods of egg dyeing were simple to do and fun to make. The preparation and element of surprise when all the eggs were done, make it impossible for us not to do these again.

But, the best part of it all was an afternoon spent laughing and making memories that will last for years to come. You can't go wrong with that.


Comments